How to set up a SIP trunk in FreePBX
Learn how to connect a SIP trunk to FreePBX for incoming and outgoing calls with zero fixed cost.
FreePBX is an open source user interface (UI) for Asterisk, an open source telephony server.
In this article we will go through how you can set up a SIP-trunk in FreePBX in a matter of minutes.
Step-by-step guide
You can have your new SIP trunk up and running in a few minutes – at zero fixed cost – by following these steps:
- Create a free account
Sign up for a free account here. - Get a phone number for testing
On the phone numbers page you can select a free trial number. This allows you to test things a few days for free. - Redirect incoming calls to your SIP address
Configure your free trial number to send incoming calls to the SIP address of your server (see below). - Configure FreePBX
Follow the steps in the next section to configure your FreePBX to receive and make calls via your new SIP trunk.
Whitelist IPs for outgoing calls
To allow outbound calls, you need to get the Public IPs of your servers whitelisted.
- Send your public IPs
Send your server Public IP addresses to support@sonetel.com so that they can be whitelisted. - Whitelist IPs in your Firewall
Whitelist Sonetel ‘s IP addresses in your FreePBX firewall and under pjsip trunk.
Whitelist IPs for incoming calls
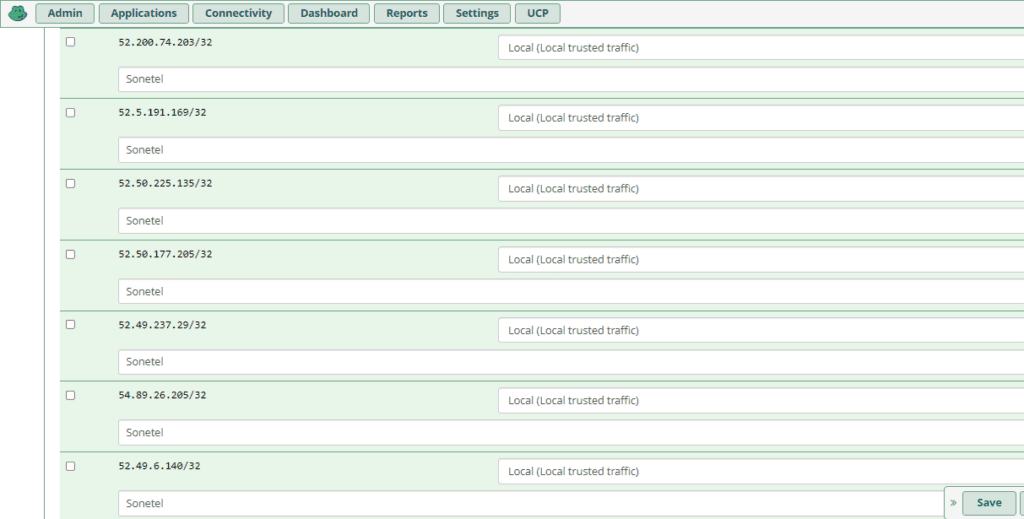
To allow incoming calls to reach your FreePBX you need to whitelist the IPs in FreePBX – that the calls (and audio) will originate from.
- Whitelist the IPs
Go to Connectivity > Firewall > Networks, and whitelist all these IP addresses in Firewall Networks, Intrusion Detection. - Check the FreePBX firewall guide
See the recommended firewall settings in FreePBX.
See the below screenshots for reference.
Create a SIP trunk in FreePBX
Next, you need to configure the inbound call settings in your FreePBX to ensure that incoming calls across your SIP trunk can be answered.
Create a SIP Trunk and an Inbound route for receiving calls.
- Create PJSIP trunk
First Create a pjsip trunk for inbound calls using IP Based authentication. Go to Connectivity -> Trunks create a new trunk selecting “Add SIP (chan_pjsip) Trunk” type. Add below details in the trunk configuration.- General Settings
- Trunk Name: sip.sonetel.com
- Set outbound Caller ID: Sonetel Number
- PJSIP-> General Settings
- Authentication: None
- Registration: None
- SIP server: sip.sonetel.com
- General Settings
- Submit
After making the changes click on Submit and apply the configuration to save the settings.
See the below video for reference.
Create an Inbound Route in FreePBX
Create an inbound route for all phone numbers . This will mean that all incoming calls on all phone numbers will be handled by the same inbound route.
Follow the below steps.
- Add incoming route
Go to the Incoming Routes section, and then click Add Incoming Route. - Give it a name
In the Description field, enter a description. Give the name for the inbound route. - Leave Caller ID blank
Leave the Caller ID Number field blank and make no other changes to the rest of the route. - Configure call destination
Set the destination to where you would like the incoming calls to go to. For example, this might be a Ring Group, IVR, Extension, etc. - Submit
Submit your changes, and then click Apply Configuration Changes at the top of the screen.
Here is a video that shows the steps:
Advanced option: Do it per phone number
Optionally create an Inbound route for each of your DIDs (phone numbers) to allow the FreePBX Server ta handle calls differently, dependent on number called.
Follow the below steps for each DID.
- Add incoming route
Go to the Incoming Routes section, and then click Add Incoming Route. - Give it a name
In the Description field, enter a description. Give the name for the inbound route. - Enter the number
In the DID Number field, enter your DID number in this format “_.19172592253” - Leave Caller ID blank
Leave the Caller ID Number field blank and make no other changes to the rest of the route. - Configure call destination
Set the destination to where you would like the incoming calls to go to. For example, this might be a Ring Group, IVR, Extension, etc. - Submit
Submit your changes, and then click Apply Configuration Changes at the top of the screen.
Repeat each step above for each phone number (DID) for which you want to create separate route.
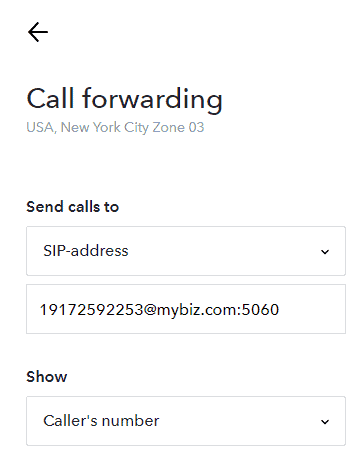
Please note that the DID also needs to be passed along in the SIP address, as a the User ID, when forwarding the call from Sonetel.
<sip ID>@<your domain or IP address><optional port info starting with ":">
For example 19172592253@mybiz.com
Enable outbound calls from your FreePBX
To be able to make calls from our FreePBX, via the SIP trunk, to any mobile or landline worldwide – follow these steps.
-
Add Outbound Route
Create an Outbound Route by going to Connectivity → Outbound routes and click on “Add Outbound Route” -
Route settings
Under Route settings-
Give the route a name such as “Sonetel Outbound”
-
In “Trunk sequence for matched routes” select the Sonetel SIP trunk “sip.sonetel.com” we created earlier
-
-
Dial Patterns
In the tab “Dial patterns” specify the pattern based on what calls you want to send via Sonetel. If you want all outbound calls to be sent via Sonetel set the pattern as “NXXXXXXXXXXX” -
Submit
After making the changes click on Submit and apply the configuration to save the settings.
Here’s a video showing how to set up an outbound route:
Configure the numbers in Sonetel
The following settings need be made in your free Sonetel account for the DID (Phone number), to get inbound calls sent to your FreePBX.
Click on the DID in the list to access the settings.
Configure the DID to forward calls to the SIP address you want to forward the calls to (your FreePBX).
In this case, the User ID (the first part of the SIP address that comes before “@” is set to the same number as the DID. This approach ensures that FreePBX will be aware of which DID that is called and allows you to create separate inbound routes for each DID. This allows incoming calls to different DIDs to be connected to different end points in FreePBX.

Things you can do next
If you are happy with your new SIP-trunk, you may consider taking additional steps.
- Add some funds to your prepaid account
Charges for calls are deducted from your Sonetel prepaid account which can be refilled with credit card, PayPal and more. - Add some more phone numbers
You can get more phone numbers in your hometown or anywhere else worldwide, and connect them to your Asterisk via your SIP trunk. You can also port existing numbers to Sonetel. - Set up an Avalanche message
Consider preparing a message using the Voice apps, that can be played to callers in case your Asterisk server becomes unavailable at any point in time. - Use the lower Intra-EU rates
If you make calls to European countries, consider using the methods available for minimizing your cost for calls.
Need help?
We can help you set up and configure your FreePBX for an hourly fee. Contact support@sonetel.com if this is of interest.


